
Azure Logics Apps is a powerful technology to help you automate your business processes without much coding. This tutorial will introduce you to Azure Logic Apps, their value proposition and a step by step explanation on how to use to build email approval process. Hang here to learn more!
In every enterprise, processes and workflows are crucial to running the business. Businesses require a way of automatizing different business processes as well as connecting multiple applications they use. As cloud adoption increases, it is becoming a more imperative requirement for integrating apps, workflows, and cloud data. Historically, organizations used to do these integrations via custom code, which can get expensive to maintain!
Microsoft Azure Logic App Services offers a way to perform these integrations and automating business processes, making workflows more efficient by controlling Software as a Service (SaaS) components.
In this article, you will learn a brief about the Azure Logic Apps, why you should use them, and a step-by-step practical scenario to better understand.
What are Azure Logic Apps?
Azure Logic Apps is a cloud-based service that allows you to automate and streamline processes, tasks, and workflows when you want to connect apps, data systems, processes, and services across organizations or enterprises.
Logic Apps simplifies how you design and create flexible solutions for systems integration, Enterprise Application Integration (EAI), and business-to-business (B2B) communications, whether on-premises, in cloud services, or both.
Here are a few work that can be automated with logic apps
- Process and route orders on-premises systems and cloud services.
- Send email notifications by Office 365 when events happen in different systems, applications, and services.
- Transfer uploaded files from an SFTP or FTP server to Azure Storage.
- Track tweets related to particular topics, study the sentiments and develop task alerts or reminders for things that require review.
Logic Apps are an important element of Microsoft's Cloud Integration Platform. The goal is to make integration effortless so that everyone can create simple integrations that are stable and scalable without the challenging learning curve.
Why Should You Use Azure Logic Apps Instead of Custom Code?
Azure Logic Apps integration platform provides prebuilt Microsoft-managed API connectors, as well as built-in functions that let you connect and integrate applications, data, services, and systems more efficiently and swiftly. It is easier to concentrate on defining and creating your solution's functionalities and business logic instead of finding out how to connect to your data.
It is not necessary to write code. However, if you have to write code, you could create code snippets with Azure Functions and then run the code within your workflow. It is also possible to create code snippets that will run within your workflow using inline code actions.
Azure Microsoft Logic Apps is among the most efficient workflow solutions to expand the integration capabilities of your platform into the cloud. This seamlessly links your applications and services, on-premises or cloud, and brings all your business workflows all in one location for greater reliability and scaling.
Azure Logic Apps is a serverless workflow that can be accessed in the cloud and is an integral part of Azure's Platform as a Service (PaaS) feature set.
It is different from other customized workflow programs with its plethora of options right out of the box that greatly speeds up the process of creating workflows.
Here, we have listed the top 5 reasons you should consider Azure Logic Apps as your integration platform.
Cost Effective
Azure Logic Apps is the most affordable platform for enterprise integration available in the market.
The service comes with no cost for initial setup, and like the other Azure Services, You don't need to cover maintenance of the infrastructure since Microsoft controls it.
Since Azure Logic Apps is a serverless engine, you don't pay for resources you might not use as you're billed according to consumption. You only pay for the resources you use. If you have a connection for Office 365 with a 'When a file is modified' trigger, you will be only charged when files get modified and execute the action.
Drag-and-Drop Design
Azure Logic Apps creates workflows easily using its user-friendly, drag-and-drop interface built into the Logic Apps Designer. The feature is available through Azure Portal via your standard Web browser. You can create automated business processes and integrations into systems with a minimum of code with hundreds of pre-built connectors. It will automatically generate the code as it runs in the background.
Scalable & Lightweight
Azure Logic Apps is flexible because of its capacity to scale as a cloud-based servers-only computing system.
Traditional application development for enterprises typically requires a lot of stress regarding hosting, monitoring, and scaling. Serverless applications such as Azure Logic Apps take care of these different concerns in one managed service.
Serverless computing automatically increases the size of your workflow with the resources it requires, and there's no requirement to create VMs.
Access to 200+ Enterprise Connectors
Azure Logic Apps connectors are best considered as elements that connect your resources and determine the proper action you want to trigger at each point.
Connectors can reduce or eliminate integration issues when connecting your devices, applications, data, and services, as it is simple to use for both non-coders and developers. Furthermore, Azure Logic Apps easily has one of the largest collections of connectors of every integration platform, including more than 200+ connectors for the most well-known SaaS applications, such as Dropbox, Dynamics, Outlook, Twitter, and Salesforce.
In-Built Monitoring
Monitoring tools built into the system help you look back at the history of your applications, processes, data, and services. It's quick and easy to monitor every aspect of performance, including the status of the run and the history of triggers. Since it's hosted in the cloud, authorized users can quickly access the information from any place.
What is the Value Proposition of Azure Logic Apps?
Azure Logic Apps is a framework that makes it easier to design complex workflows. They accomplish this by providing simple, pre-built designs and templates and connectors to seamlessly connect SaaS and enterprise apps, which can result in the reduction of writing code.
Logic Apps pushes an organization to adopt a more global development approach instead of using the traditional frameworks that are standalone for each project, which is costly. They also use internally developed APIs as well as legacy web services with domain-specific functions.
Here are a few pointers to define the value proposition of Azure Logic Apps
- Creates Business processes and Workflows Visually.
- Providing Integration Capabilities to Mobile, Web, and API Applications.
- Automating Enterprise Application Integration (EAI) / B2B.
- Increase in Performance
- Enabling Organization/Enterprise to Experiment
This software's most significant value proposition is the possibility to create and test your Logic Apps on your local machine. This lets you integrate it directly with your workflow for development and verify that everything works exactly as you expect before publishing any content to Azure.
Azure Logic App Step-by-Step Use Case Tutorial
This tutorial demonstrates how you can create an instance logic application that automates the approval process. This particular logic application processes subscription requests to mailing lists managed via the MailChimp application.
This logic app has several actions:
- Observe an email account for any requests.
- Sending these requests to be approved.
- Examining whether or not the request is approved.
- Adding the approved members to the list.
- Checking whether new members are included in the mailing list.
This tutorial teaches you how to:
- Create a blank logic application.
- Set up a trigger that checks emails for subscription requests.
- Create an action that will send emails to either approve or reject the requests.
- Create a condition that will check the response of approval.
- Include an action that adds those who have been approved to join the list of mailing recipients.
- Create a condition that will determine whether the members added themselves to the list.
- Create an action that will send an email confirming that the members were able to join the list.
Create Your Logic App
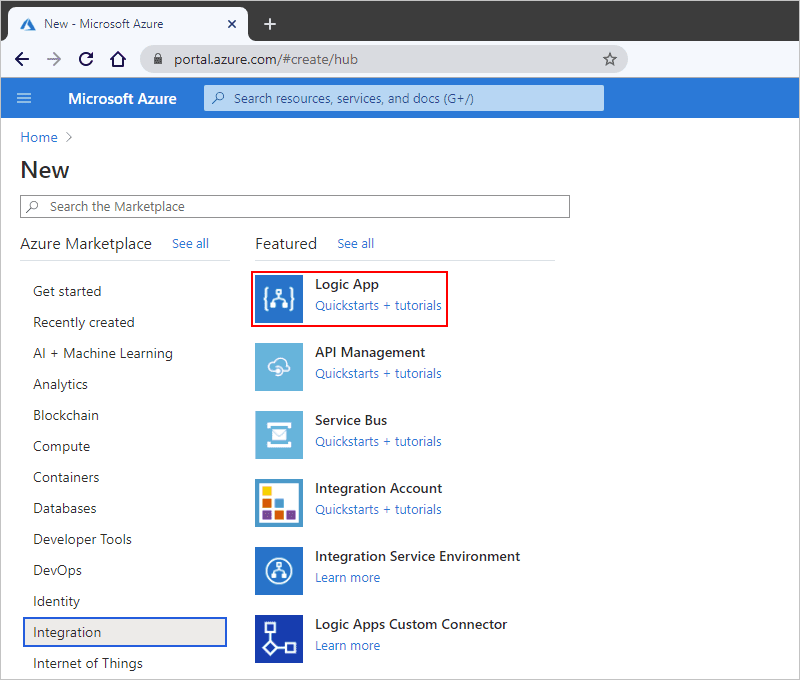
Step 1: Log in to the Azure portal using your Azure account login details. On the Azure home page, choose the option to create an Azure resource.
Step 2: On the Azure Marketplace, choose Integration > Logic Apps
Step 3: In the Logic Application pane, enter the information provided here regarding the logic app you'd like to develop.
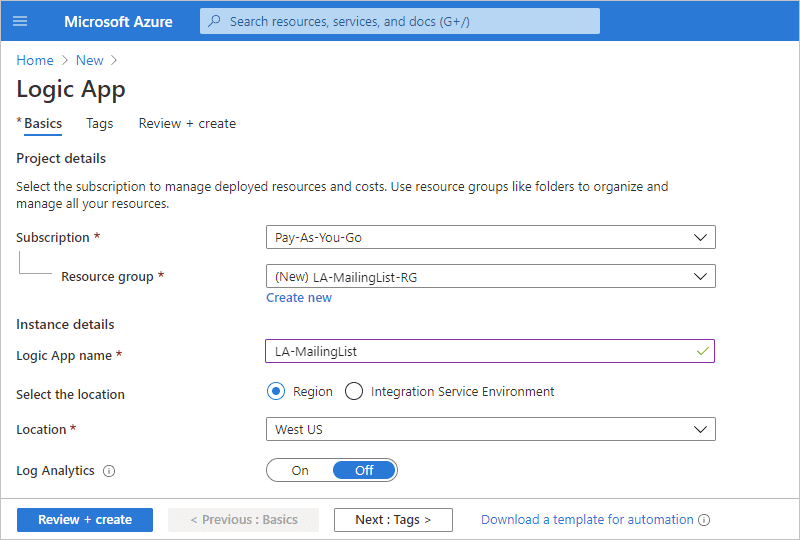
Step 4: After you've finished, click Review + Create. After Azure checks, the details about your logic application, choose to create.
Step 5: After Azure deploys your application, choose to Go the resource.
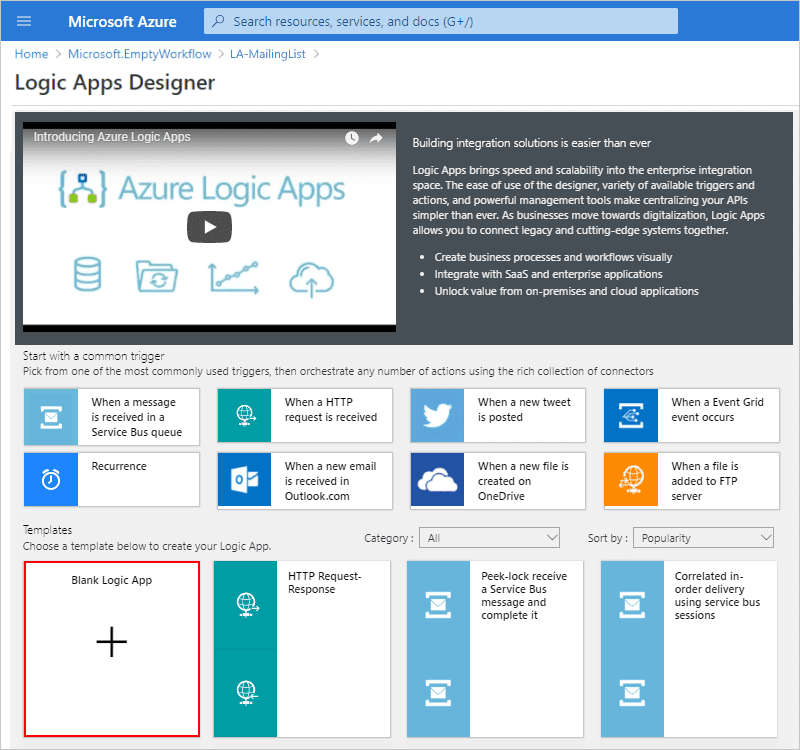
Azure opens the Logic Apps templates selection pane that shows an overview video, commonly used triggers, and templates for logic apps.
Step 6: Scroll through the common triggers and the video sections to the templates section, and choose Blank Logic App.
After that, add an Outlook trigger that can detect incoming emails that contain subscription requests. Each logic application must begin with a trigger. A trigger will fire when a particular event occurs or when new data meets certain requirements. For more details, refer, to how to build your first logic application.
Adding Triggers to Monitor Emails
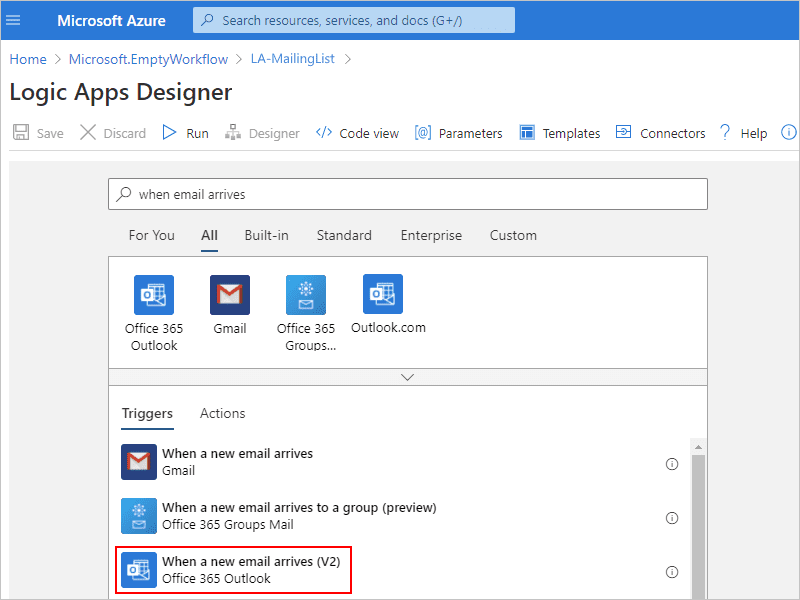
Step 1: Within the Logic Apps Designer search box Enter the phrase "when email arrives" and then choose the trigger labeled “when a new email arrives.”
- For Azure school or work accounts, choose Office 365 Outlook.
- To access private Microsoft accounts, choose Outlook.com.
This is the same example, but you can choose Office 365 Outlook.
Step 2: If you don't have a connection, sign in and verify login to the email address you use.
Azure Logic Apps makes a connection to your email account.
Step 3: In the trigger section, include the criteria to check for new emails.
- Set the folder where you will check emails. Keep the other properties to their default settings.
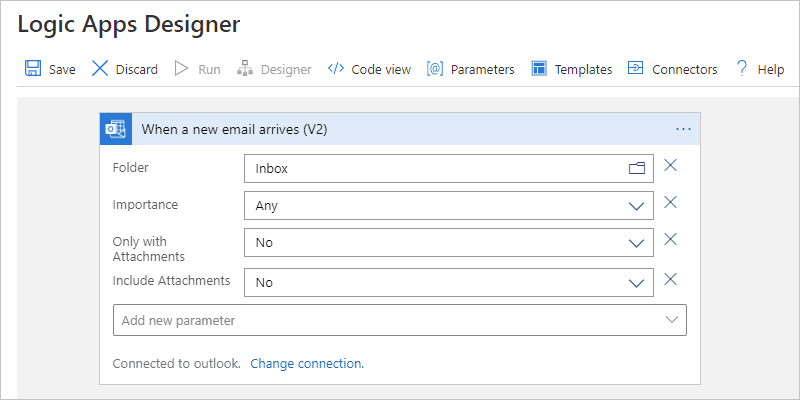
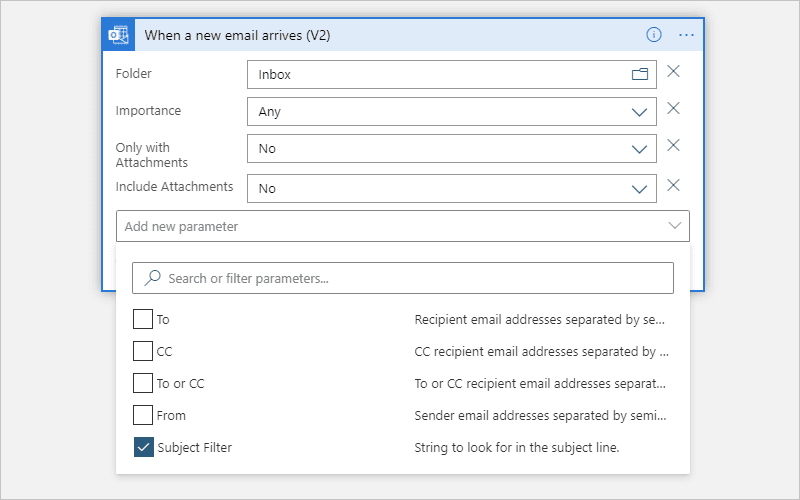
- Include the trigger's Subject Filter property to ensure you are able to sort emails according to your subject line. Go to the Add New Parameter list, and then choose Subject Filter.
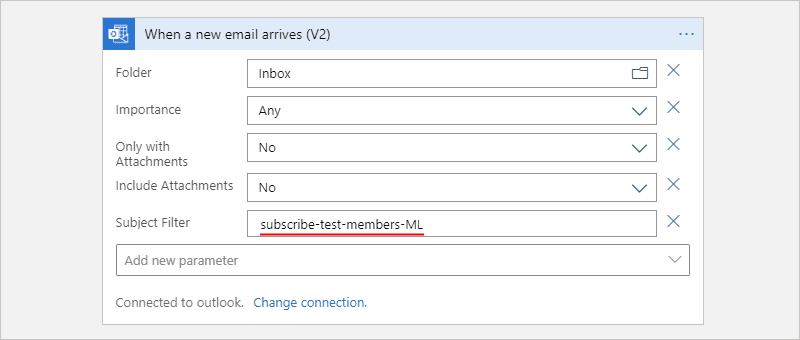
- After the property appears in the trigger, enter this text: subscribe-test-members-ML
Step 4: To hide the trigger's specifics at present, you can collapse the shape by clicking within the shape's title bar.

Step 5: Save your logic application. On the designer's toolbar, choose Save.
Your logic application is live now but does nothing other than check your new email. So include an action that reacts whenever the trigger fires.
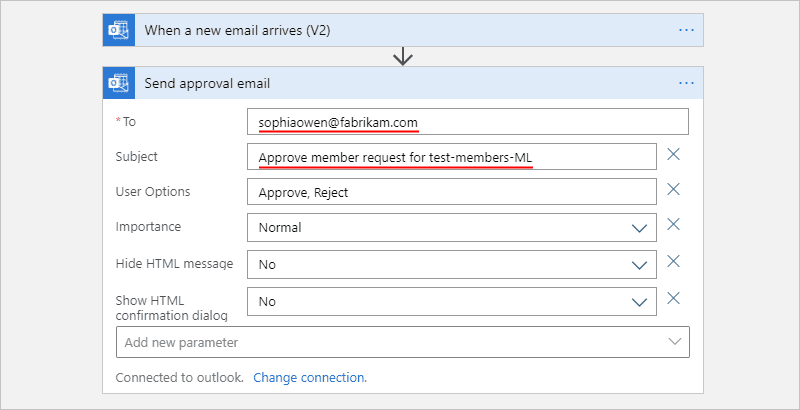
Sending Approval Email
Once you've got a trigger, you can add the action that will send an email that allows you to either approve or decline the request.
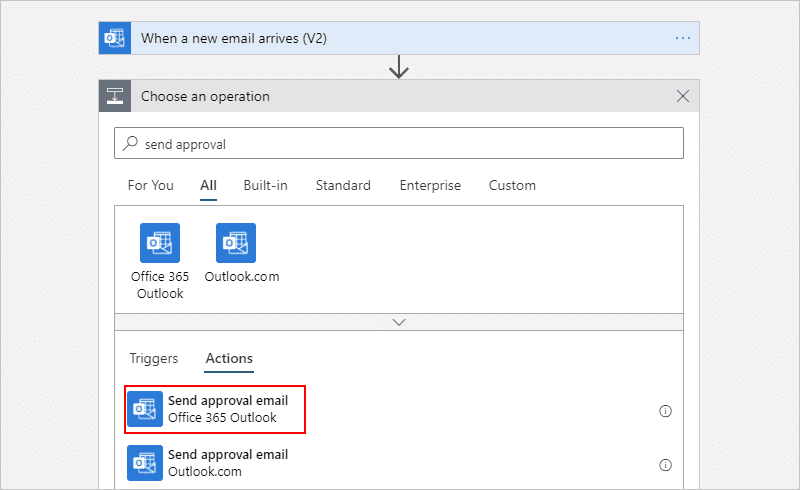
Step 1: On the Logic Apps Designer, under the When a new email arrives trigger, choose New step.
Step 2: Under Choose an operation, in the search box, type in "send approval" and choose the action titled Send approval email.
Step 3: Now enter the values for the properties, which are described and shown here. And all other properties remain at their default values.
Note: If you click within one of the edit boxes, a dynamic content list will appear that you can choose to ignore at this point. The list shows the results of previous actions that can be used as inputs to future actions within your workflow.
Step 4: Save your logic application.
Then, you can add an additional condition that tests the response of the approver.
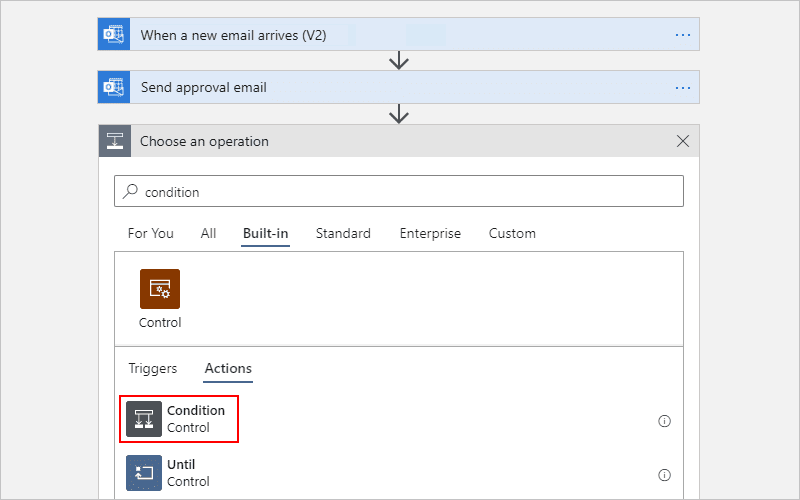
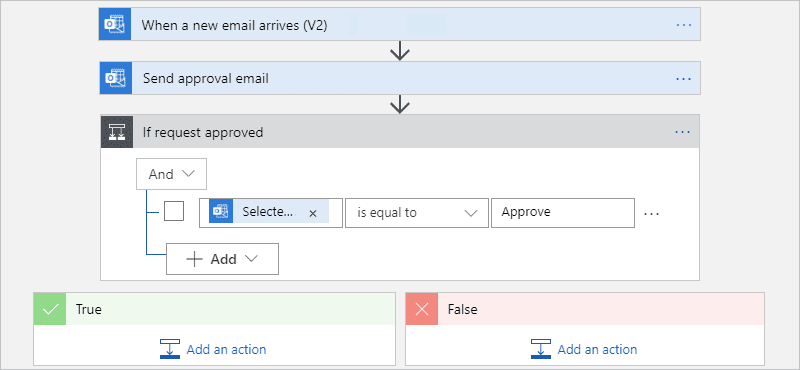
Checking Approval Response
Step 1: Under Send approval email action, choose Next step.
Step 2: Under choose and operation, choose Built-in. Within the search field, type in "condition" and choose the action titled "Condition.".
Step 3: Within the Condition title bar, choose the ellipses (...) button, then click the Rename. Change the name of the condition to the following description: If request approved.
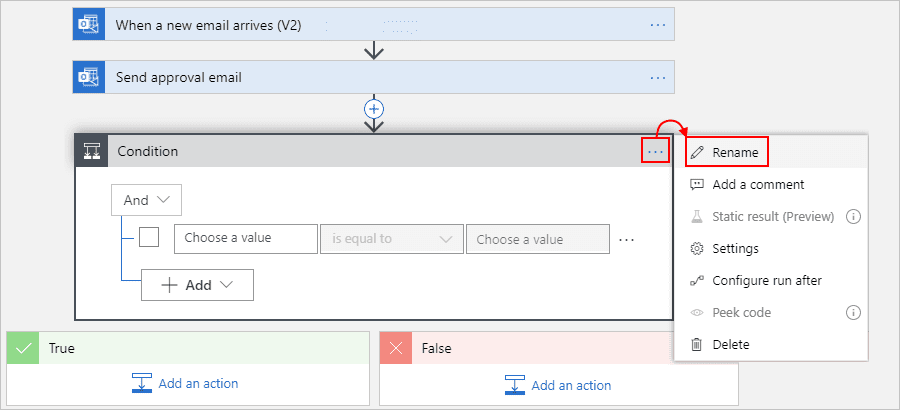
Step 4: Create a condition to determine whether the approver has selected to approve.
- On the left side of the condition, click on the choose a value box.
- From the dynamic content listing which appears under send approval emails, Select the selected Option property.
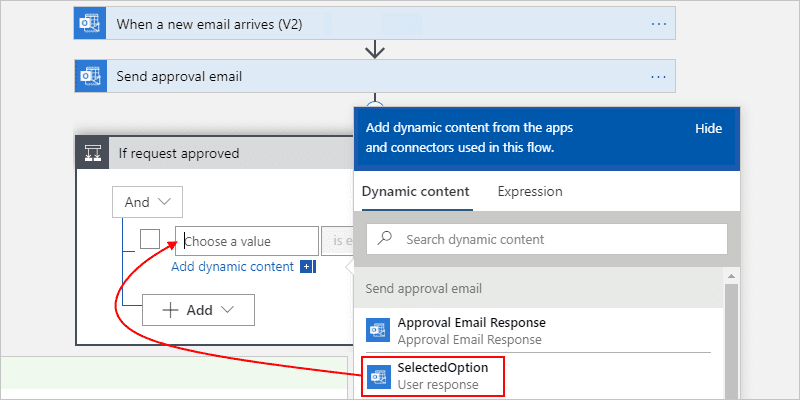
- In the middle comparison box, choose the is equal to operator.
- On the right side of the condition, in the choose a value box, type in: Approve.
Once you're done, your situation will look like this:
Step 5: Save your logic application.
Then, you must specify the actions that your logic app will perform when the reviewer accepts the request.
Adding Member to the Mailchimp List
Add an action to add the member you have approved to your email list.
Step 1: Within the condition's True branch, choose the option: Add an action.
Step 2: Under the Choose an operation search box, choose All. Then, in the search box, type mailchimp and then choose the action titled "Add member to the list."
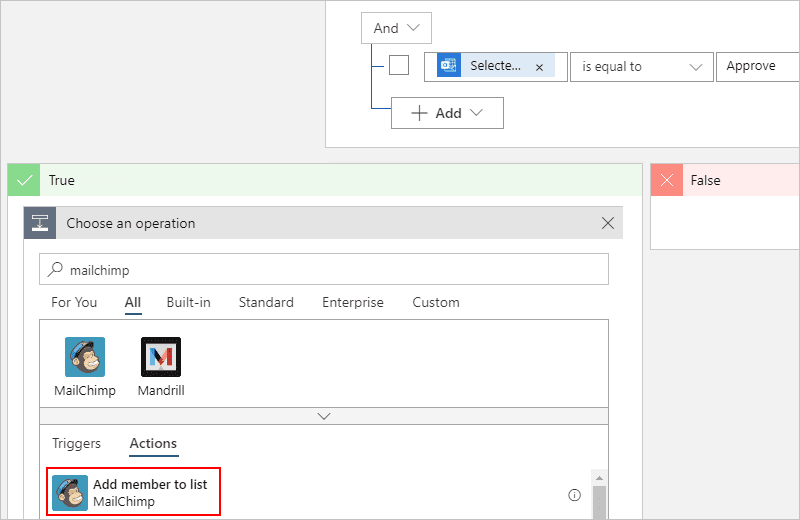
Step 3: If you don't have an account linked to your MailChimp, you'll be prompted to sign up.
Step 4: If you are using the Add member to the list action, fill in the details as shown and described here.
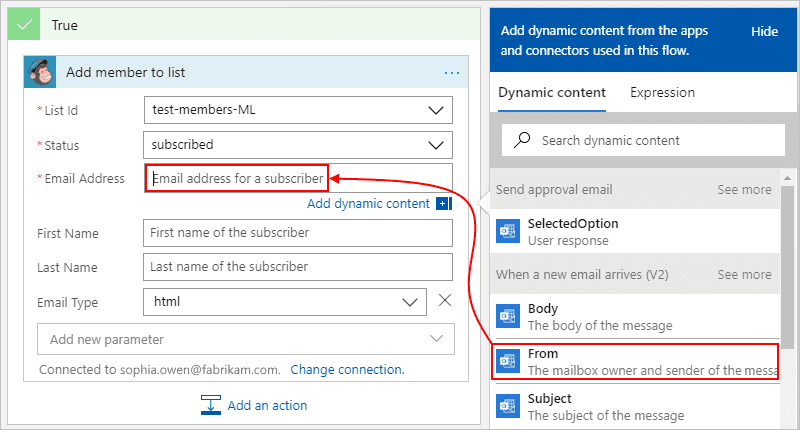
Step 5: Save Your Logic Application.
Next, Add a second condition that allows you to verify whether the new subscriber has successfully joined your mailing list. So your logic application will inform you if this operation worked or not.
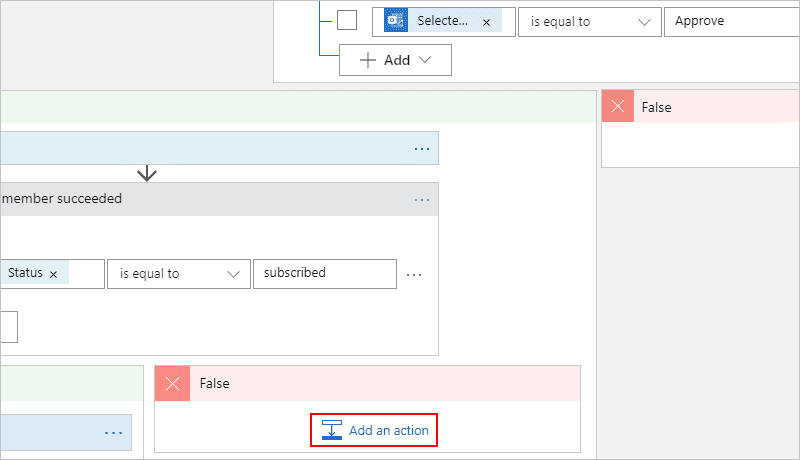
Checking for Success or Failure
Step 1: On the True branch, under the Add member to list action, choose to Add an action.
Step 2: Under choose an operation, choose Built-in. Then, in the search box, type in the condition, and then choose the action titled "Condition.".
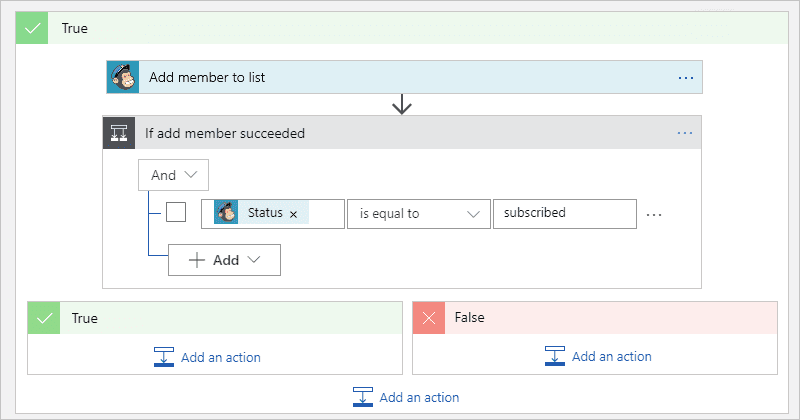
Step 3: Change the name of the condition to the following description: If add member succeeded.
Step 4: Create a condition to determine whether the person you have approved succeeded or not in joining your mailing list.
- On the left-hand side of the condition, click on the choose a value box. The dynamic list that appears within the Add member to list section, choose the status property.
For Instance, your condition might look like this:
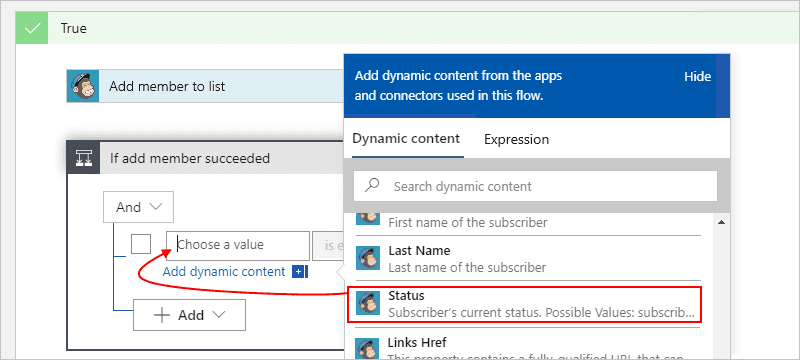
B. In the middle of the comparison box, choose is equal to operator.
C. On the right side of the condition, in the Choose a value box, enter: subscribed
When you're done, the result will look like this:
Next, you'll need to set up your email to be sent out to the member you have approved when he succeeds or fails to join the mailing list.
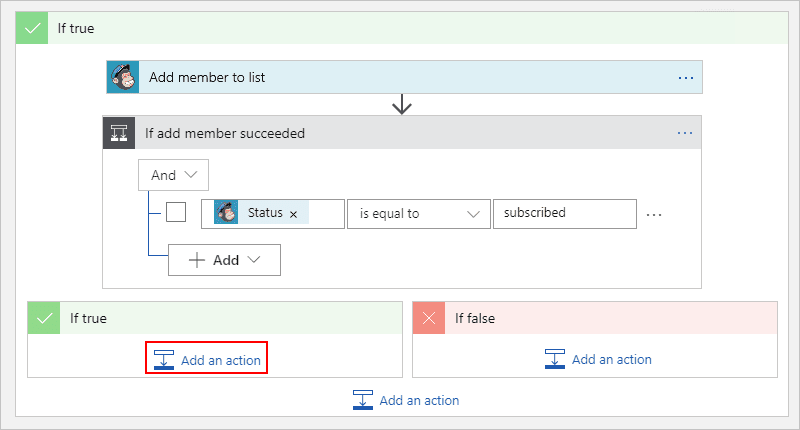
Sending Email If Member Added
Step 1: In the, If add member succeeded condition, on True branch, choose "Add an action" option.
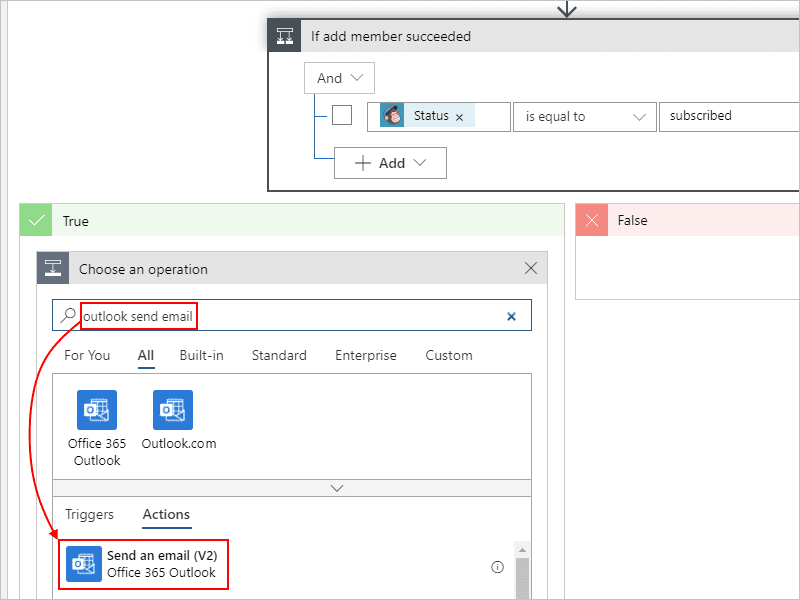
Step 2: In the Choose an operation Search box, type in Outlook send email, and choose the action titled "Send an email."
Step 3: Name the event with this description: Send email on success
Step 4: In the Send email on success action, include the details as shown and described here in the screenshot.
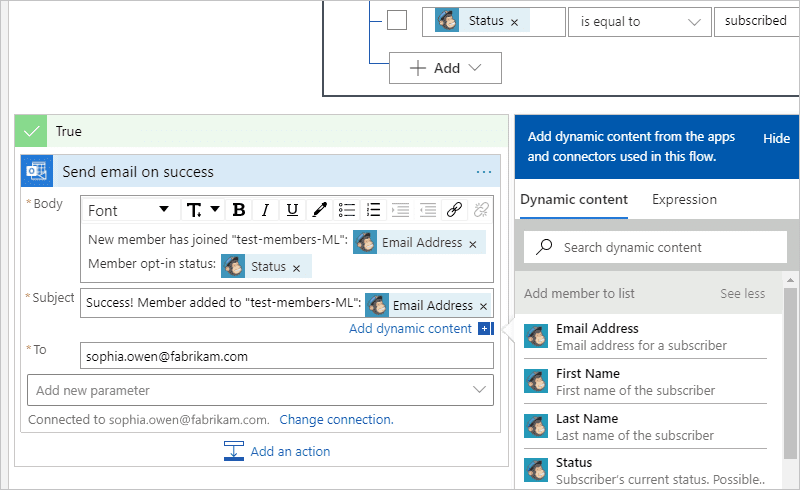
Step 5: Save your logic application.
Sending Email If Member Not Added
Step 1: Under If add member succeeded condition, in the False branch, choose the Add an action.
Step 2: In the Choose an operation search box, type in Outlook send email, and then choose the action titled "Send an email."
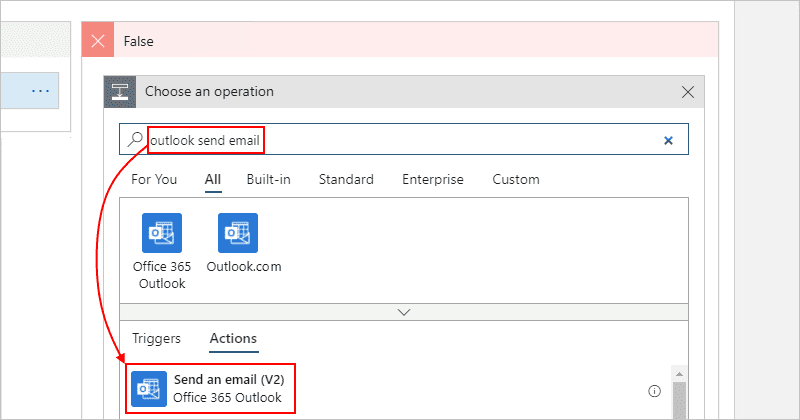
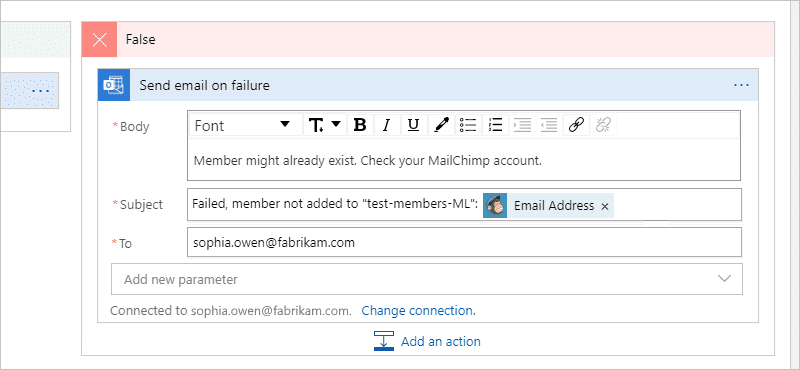
Step 3: Change the name of the action to the following description: Send email on failure.
Step 4: Give details about this step as described and illustrated in the screenshot.
Step 5: Save your logic application.
The next step is to test your logic application that now appears exactly like the following example: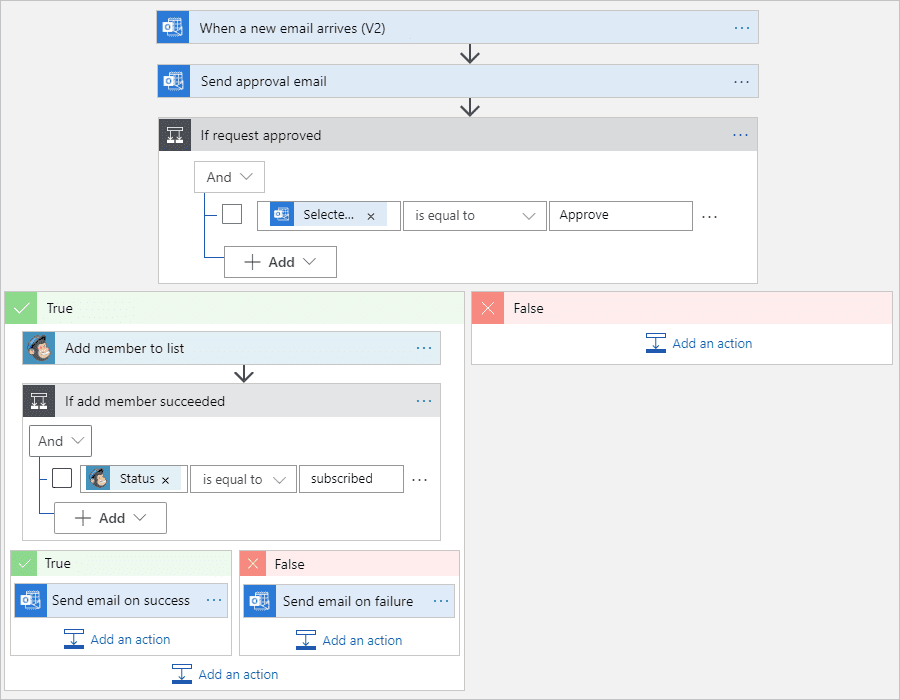
Running the Logic App
Step 1: Send yourself an email in order to check whether an email request appears in your inbox or not.
Step 2: To manually launch your logic app, from the designer toolbar, choose Run option.
If your email contains a subject that is compatible with trigger's filter on subject then your logic application will send you email to confirm your subscription.
Step 3: In the approval email you receive, choose Approve.
Step 4: If the email address of the subscriber does not appear in your mailing list, your logic application adds the email address of the subscriber, and sends an email to you in the same way as this:
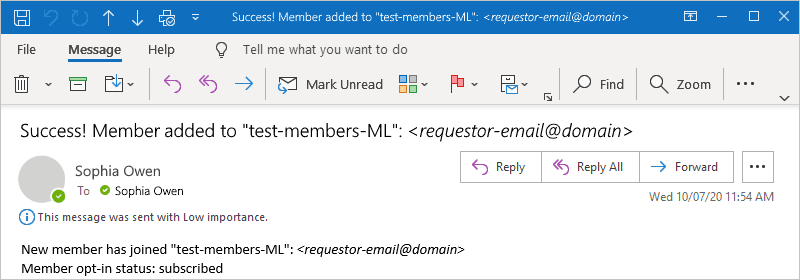
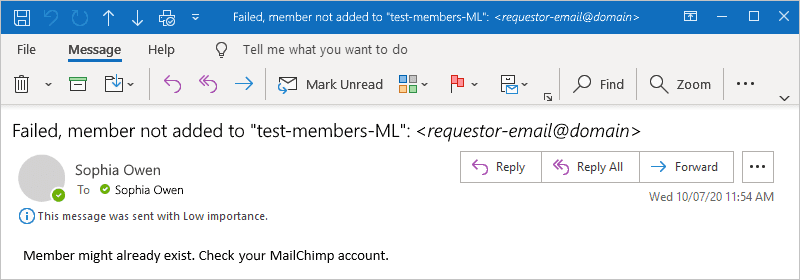
Step 5: If your logic application is unable to connect an subscriber to your database, you will receive an email that looks like this:
Congratulations! You've just developed and are running an application that uses logic to integrate information from Azure, Microsoft services, as well as other SaaS applications.
Cleaning Up the Resources
The logic app will continue to run until you remove or disable the application. If you do not require the logic sample app you can delete the resource group which contains your logic application and any associated resources.
Step 1: On the Azure portal's search box, type in the name of the resource group you have created. In the results in the section called Resource Groups, select that resource group.
This particular example has created a resource group called LA-MailingList-RG.

Step 2: On the resource group menu, ensure "Overview" is selected. On the Overview pane's toolbars, click Delete Resource group.
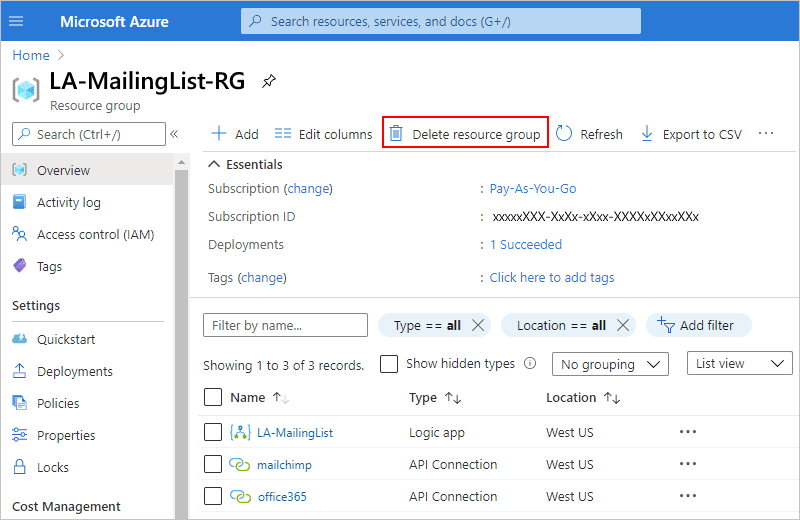
Step 3: Within the confirmation pane, type the resource group name and select Delete.
Azure Logic App Pricing Model
Every logic app type that differs in its capabilities and runs (multi-tenant single-tenant, multi-tenant, or integration service environment) has a distinct pricing structure. For instance, multi-tenant-based logic apps utilize consumption pricing, whereas logic apps running in integration services have fixed pricing. Find out the details regarding pricing and meters to Logic Apps. Make sure to use the right pricing structure, otherwise, you'll need to do some work to reduce your cloud costs later.
Standard Plan
The Azure Logic Apps Standard plan supports local development on Windows, Linux, and Mac. It features a brand new layout engine that can handle complicated workflows and allows customized connector extension extensions. Utilize the containerized runtime to execute Logic Apps locally, in the cloud, or on your premises using virtual networking capabilities.
| Price | |
|---|---|
| vCPU | $0.192/hour |
| Memory | $0.0137/hour |
Consumption Plan
This is a Pay-as-you-go pricing that charges based on the triggers and actions identified in a logic application. In a multi-tenant setting, the plan also uses connectors that allow users to access SaaS applications and on-premise data sources.
Go to the document for their ever-growing collection of Standard and Enterprise connectors. Connectors allow you to access data and applications behind firewalls, securely connect to cloud-based services, and benefit from powerful integration using existing systems on your premises that you've invested in.
Whenever a Logic App definition runs, the actions, triggers, and connector executions are logged.
| Price Per Execution | |
|---|---|
| Actions | $0.000025 First 4,000 actions free |
| Standard Connector | $0.000125 |
| Enterprise Connector | $0.001 |
Data retention: $0.12 GB/month
Integration Service Environment Plan
This is a completely isolated and secured environment for secure connection to cloud-based and on-premises applications on a large scale.
| Developer | Premium | |
|---|---|---|
| Base unit | $1.03 per hour | $6.64 per hour |
| Scale Unit | N/A | $3.32 per hour |
1 No SLA is provided on the Developer tier. Scale unit is not offered on the Developer tier.
2 The Base unit of the Premium tier includes 1 standard integration account.
Integration Account
Integration Account Integration Account is Microsoft's cloud-based solution that seamlessly integrates business processes and data sources. The Integration account lets customers benefit from Logic Apps B2B / EDI and XML processing capabilities.
| Basic | Standard | |
|---|---|---|
| EDI Trading Agreements | 1 | 1,000 |
| EDI Trading Partners | 2 | 1,000 |
| Maps | 500 | 1,000 |
| Schemas | 500 | 1,000 |
| Assemblies | 25 | 1,000 |
| Certificates | 2 | 1,000 |
| Batch Configs | 1 | 50 |
| Price/Hour | $0.42 | $1.37 |
For more detailed information, visit the pricing page of Azure Microsoft.
Conclusion
Azure Logic applications provide an appealing solution that is ideal for SMB and larger corporations to create cloud-based business workflows. Additionally, with an Enterprise Integration pack, it is now possible to create B2B integration workflows that run in the Cloud.
Businesses can set up an Integration account to save the most important B2B documents. This allows developers to develop more complex B2B workflows with the help of the connectors available. The workflow can be expanded to include hybrid situations in which data sources are hosted on-premises through the "On the premises Data Gateway" within Azure.